Integrate DeepSeek into Salesforce with GPTfy
Table of Contents
- TL;DR
- What?
- Technical Architecture Overview
- Declarative DeepSeek Configuration
- Enterprise-Grade Security Implementation
- Advanced Prompt Engineering for DeepSeek
- Grounding Rules Configuration
- Implementation in Prompt Builder
- Real-World Implementation
- Implementation Roadmap
- Conclusion
- Additional Resources
TL;DR:
Microsoft announced DeepSeek R1 on Azure. Within hours, our team connected it to Salesforce using GPTfy’s no-code declarative configuration. This guide covers Named Credential setup, security configurations, Apex interfaces for flexibility, and prompt engineering optimized for DeepSeek. The blueprint is suitable for any organization, allowing deployment of this enterprise-grade architecture without specialized AI expertise.
Not a fan of reading articles? Check out the video here: [Link to video]
What?
A practical implementation guide for connecting Microsoft Azure’s DeepSeek R1 reasoning model to your Salesforce environment through GPTfy’s declarative architecture – complete with security guardrails and enterprise integration patterns.
Who?
Salesforce admins, architects, developers, and technical leaders who need to deploy AI capabilities quickly while maintaining security, compliance, and architectural flexibility.
Why?
To leverage DeepSeek’s superior reasoning capabilities without the typical 3-6 month AI implementation timeline, while future-proofing your investment against the rapid evolution of AI models.
→ Deploy day-one technologies today. Protect sensitive data. Maintain flexibility for tomorrow.
What can you do with it?
- Automated Code Analysis: Instantly check Apex classes against organizational standards
- Standardized Quality Gates: Ensure consistent enforcement of coding policies
- Developer Guidance: Provide specific feedback with examples for improvement
- Technical Debt Management: Track code quality evolution over time
Technical Architecture Overview
Let’s cut through the complexity and focus on what matters – a secure, adaptable architecture that connects Salesforce to DeepSeek without unnecessary overhead:
The integration follows a modular pattern with five key components:
- Named Credential Layer: Securely manages authentication without exposing credentials
- GPTfy Processing Framework: Handles data extraction and formatting
- Prompt Engineering Framework: Structures communication for optimal results
This approach provides enterprise-grade capabilities without the enterprise-grade complexity typically associated with AI implementations.
Declarative DeepSeek Configuration
DeepSeek R1 setup uses Salesforce’s native Named Credential pattern – no custom authentication code or complex integrations required.
Named Credential Configuration:
- Label: Azure DeepSeek
- Name: AzureDeepSeek
- URL:
https://[your-azure-instance].openai.azure.com/openai/deployments/DeepSeek-R1/chat/completions?api-version=2024-02-15-preview - Authentication: Named Principal
- Authentication Protocol: OAuth 2.0
- Authentication Provider: Azure OpenAI
This follows Salesforce’s security best practices, keeping sensitive credentials managed by the platform rather than embedded in code.
AI Model Configuration in GPTfy:
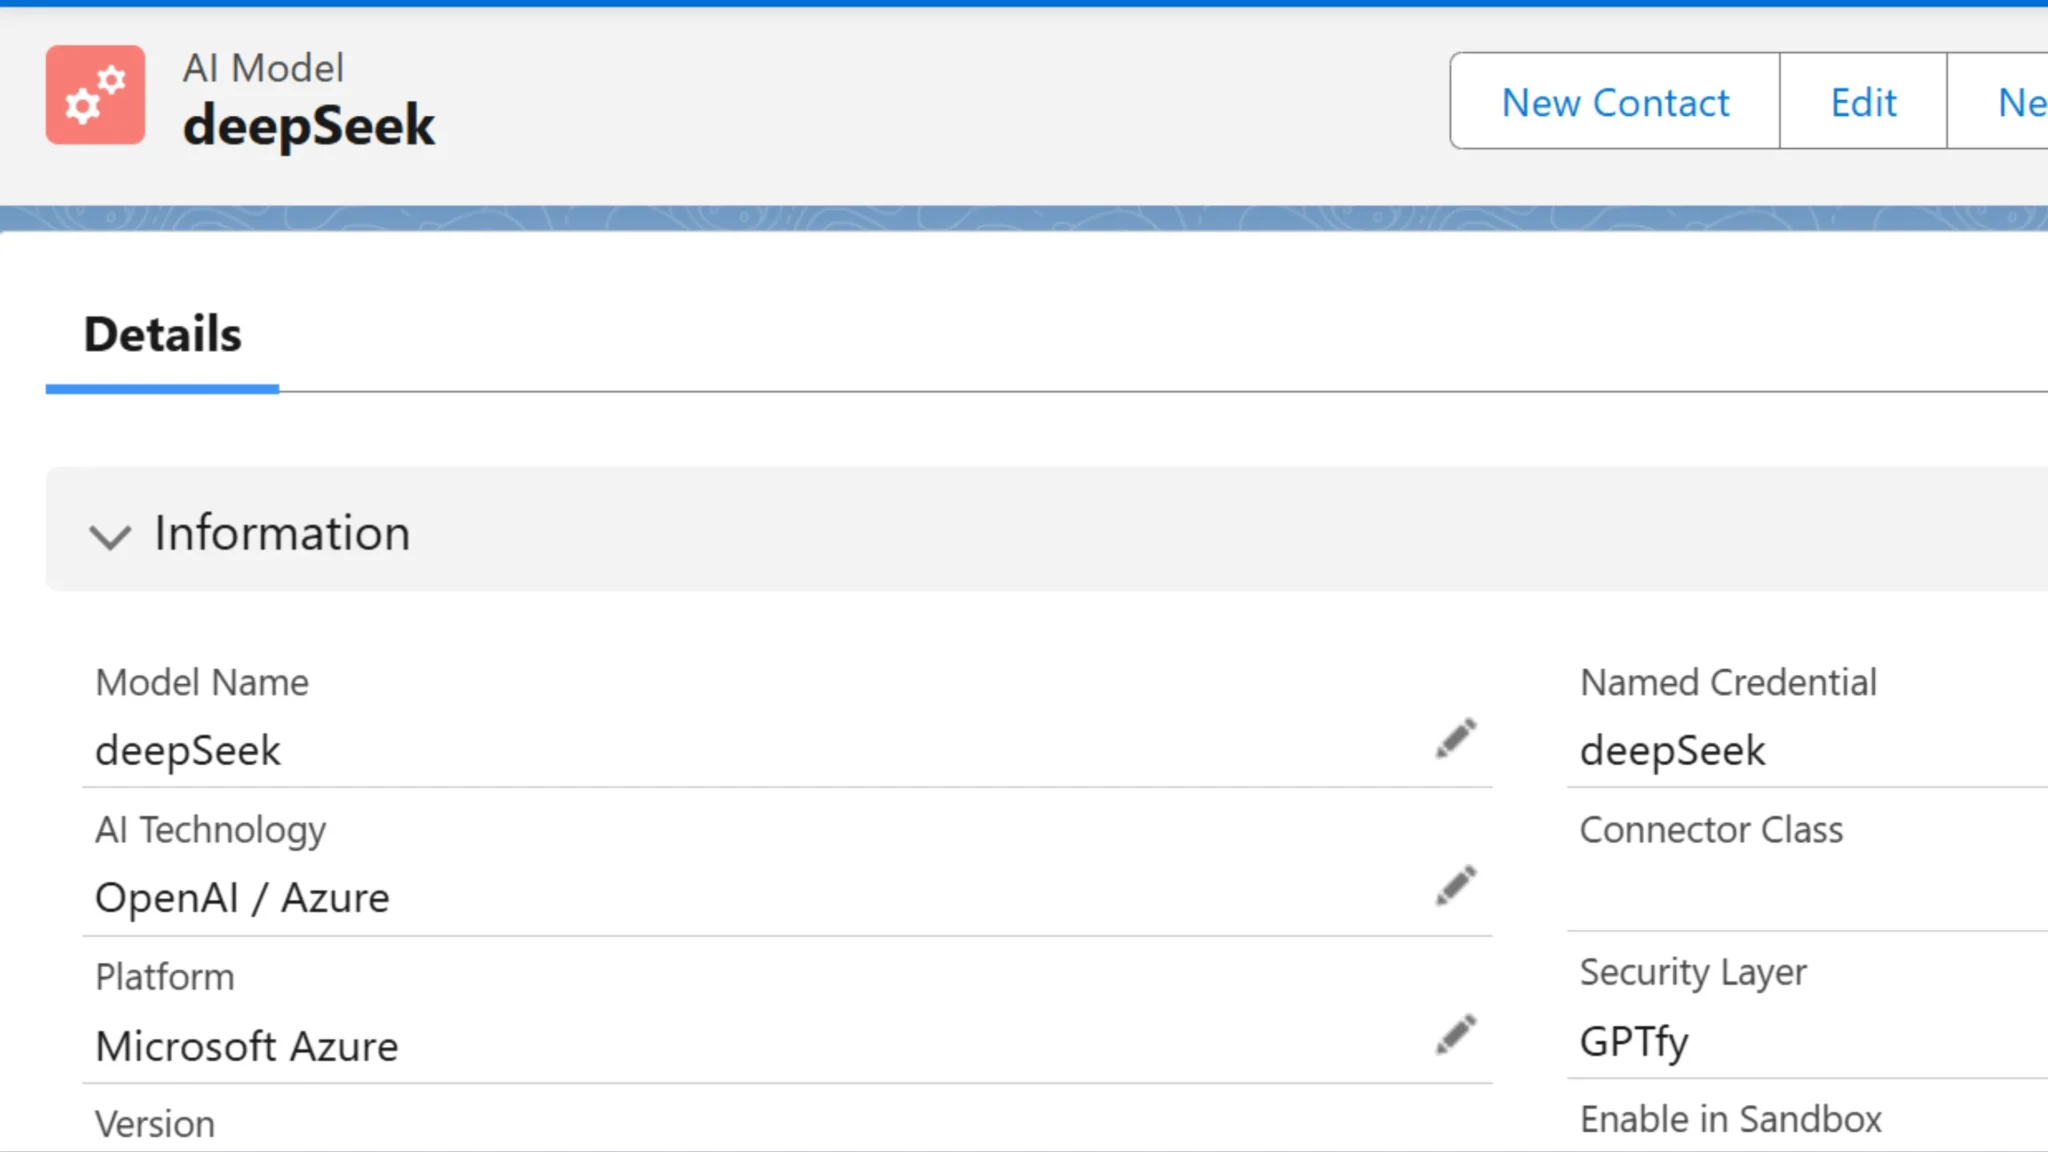
- Model Name: DeepSeek R1
- Platform: Azure OpenAI
- Named Credential: AzureDeepSeek
- AI Technology: DeepSeek
- Type: Chat
- Temperature: 0.1 (configurable)
- Top P: 0.10 (configurable)
- Max Tokens: 2000 (configurable)
These parameters control DeepSeek’s reasoning process – lower temperature values produce more deterministic responses, while higher values allow for more creative exploration.
Implementation Example
Rather than wading through complex configuration, you can set this up through GPTfy’s intuitive interface:
- Access the GPTfy Cockpit → AI Models → Create Your Own
- Fill in model details, pointing to your Azure instance
- Save and activate
- Test on a sample record
The entire configuration process takes less than 30 minutes – no deployment packages, no code reviews, no lengthy testing cycles.
Enterprise-Grade Security Implementation
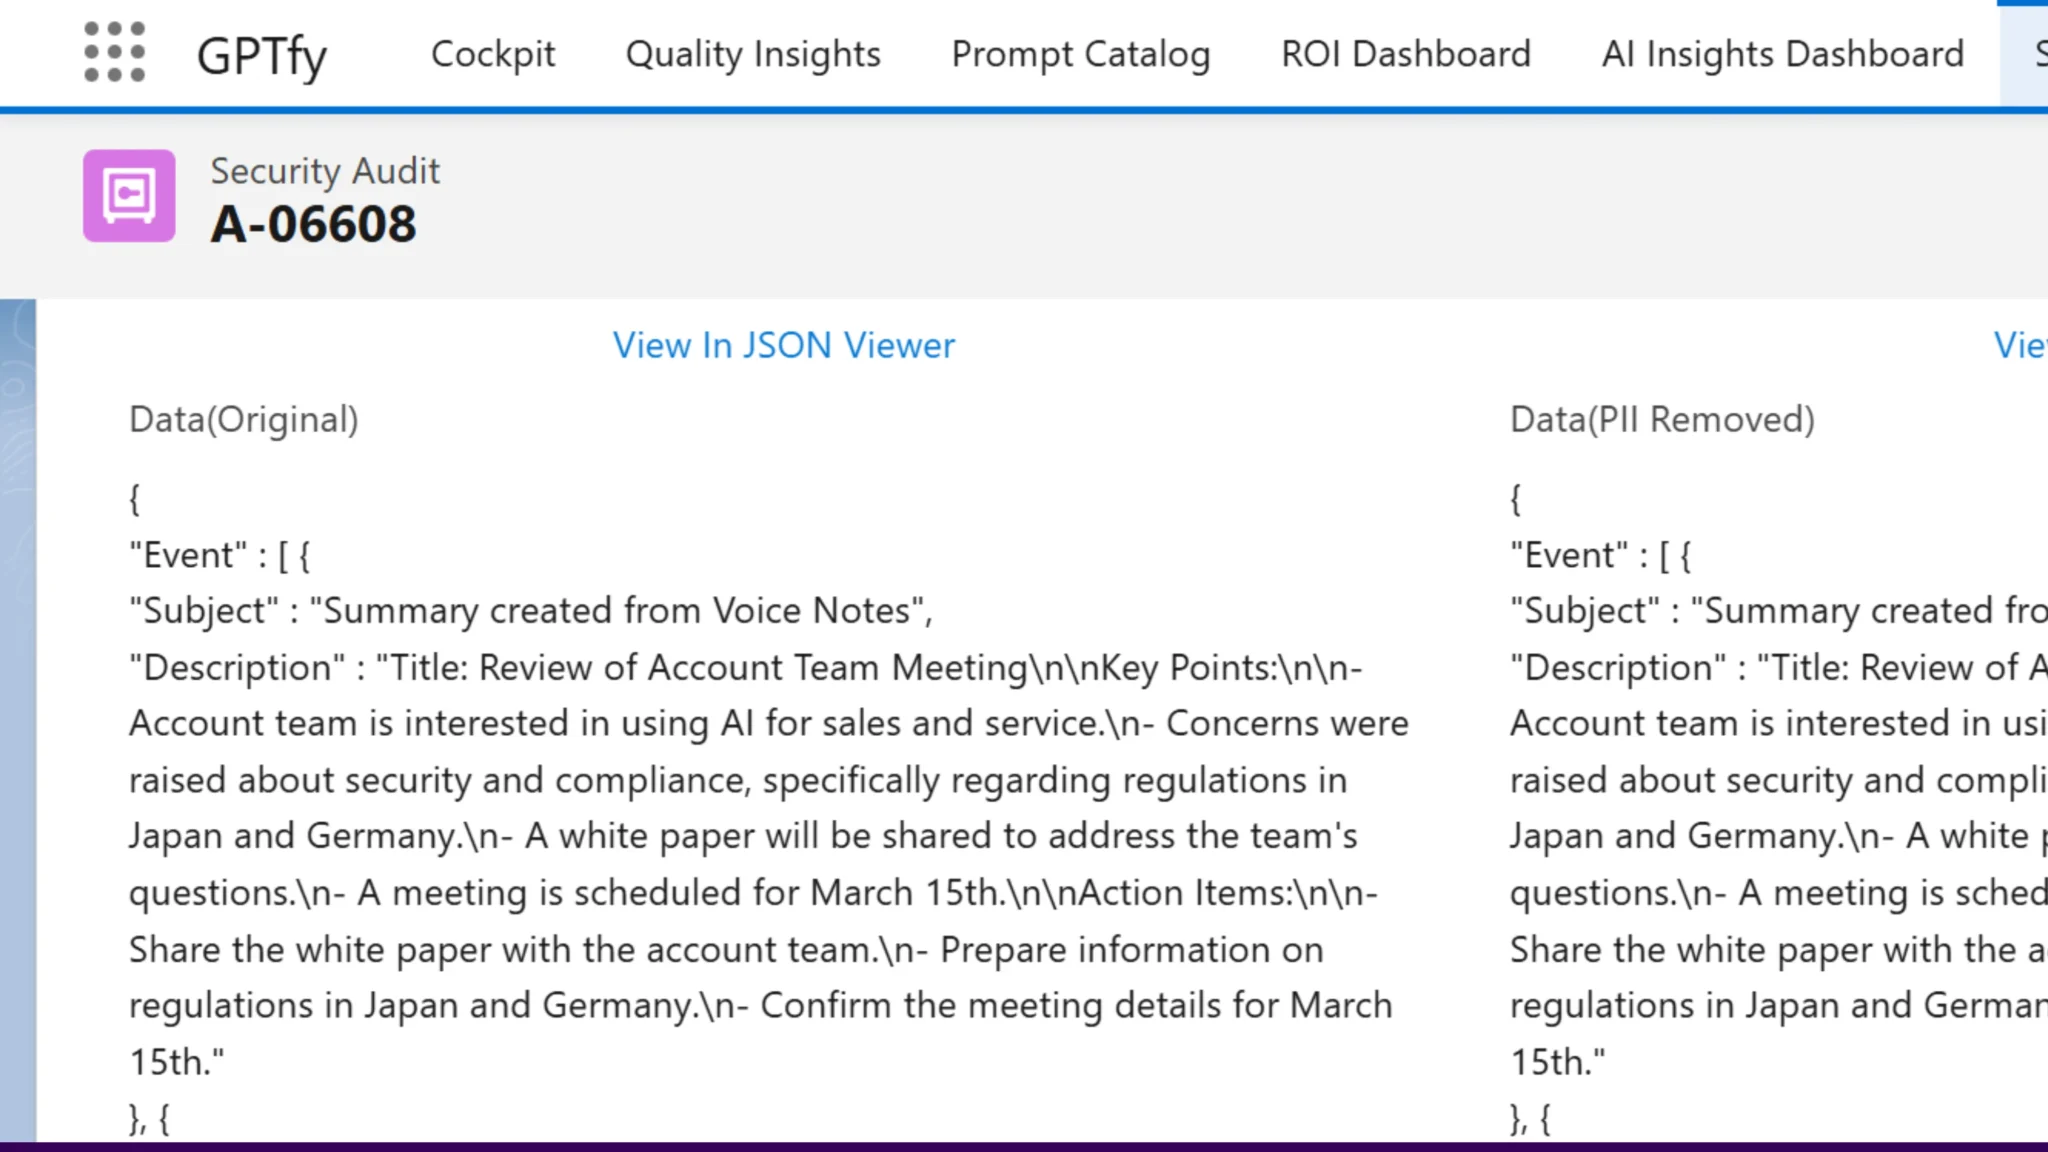
Security isn’t an afterthought – it’s built into the core architecture through a multi-layered approach that’s both comprehensive and pragmatic.
Layer 1: Field-Level Protection
This layer focuses on explicit field values containing sensitive information:
Field: Email
Protection Type: Entire Value
When email value john.doe@example.com is processed, it’s automatically replaced with a secure token like [SF-0123-001] before reaching DeepSeek.
Layer 2: Regex-Based Pattern Detection
This intelligent layer identifies and masks sensitive patterns within text fields:
Pattern Name: US Phone Number
Pattern: \(?\d{3}\)?[-.\s]?\d{3}[-.\s]?\d{4}
Match Complete Word: true
Ignore Special Characters: true
For example, if “Call me at (555) 123-4567 to discuss” appears in a description field, the phone number is automatically masked before sending to DeepSeek.
Layer 3: Global Blocklist Protection
The third security layer handles specific terms you never want sent to external AI models:
Blocklist Category: Product Names
Values: [Confidential Product X, Secret Project Y, Unreleased Feature Z]
Every interaction creates a comprehensive security audit record for compliance and monitoring:
This approach ensures DeepSeek never sees sensitive information while maintaining context and utility in responses – giving you both security and functionality without compromise.
Advanced Prompt Engineering for DeepSeek
DeepSeek R1 excels at reasoning tasks, making prompt engineering crucial for optimal results. Here’s what works:
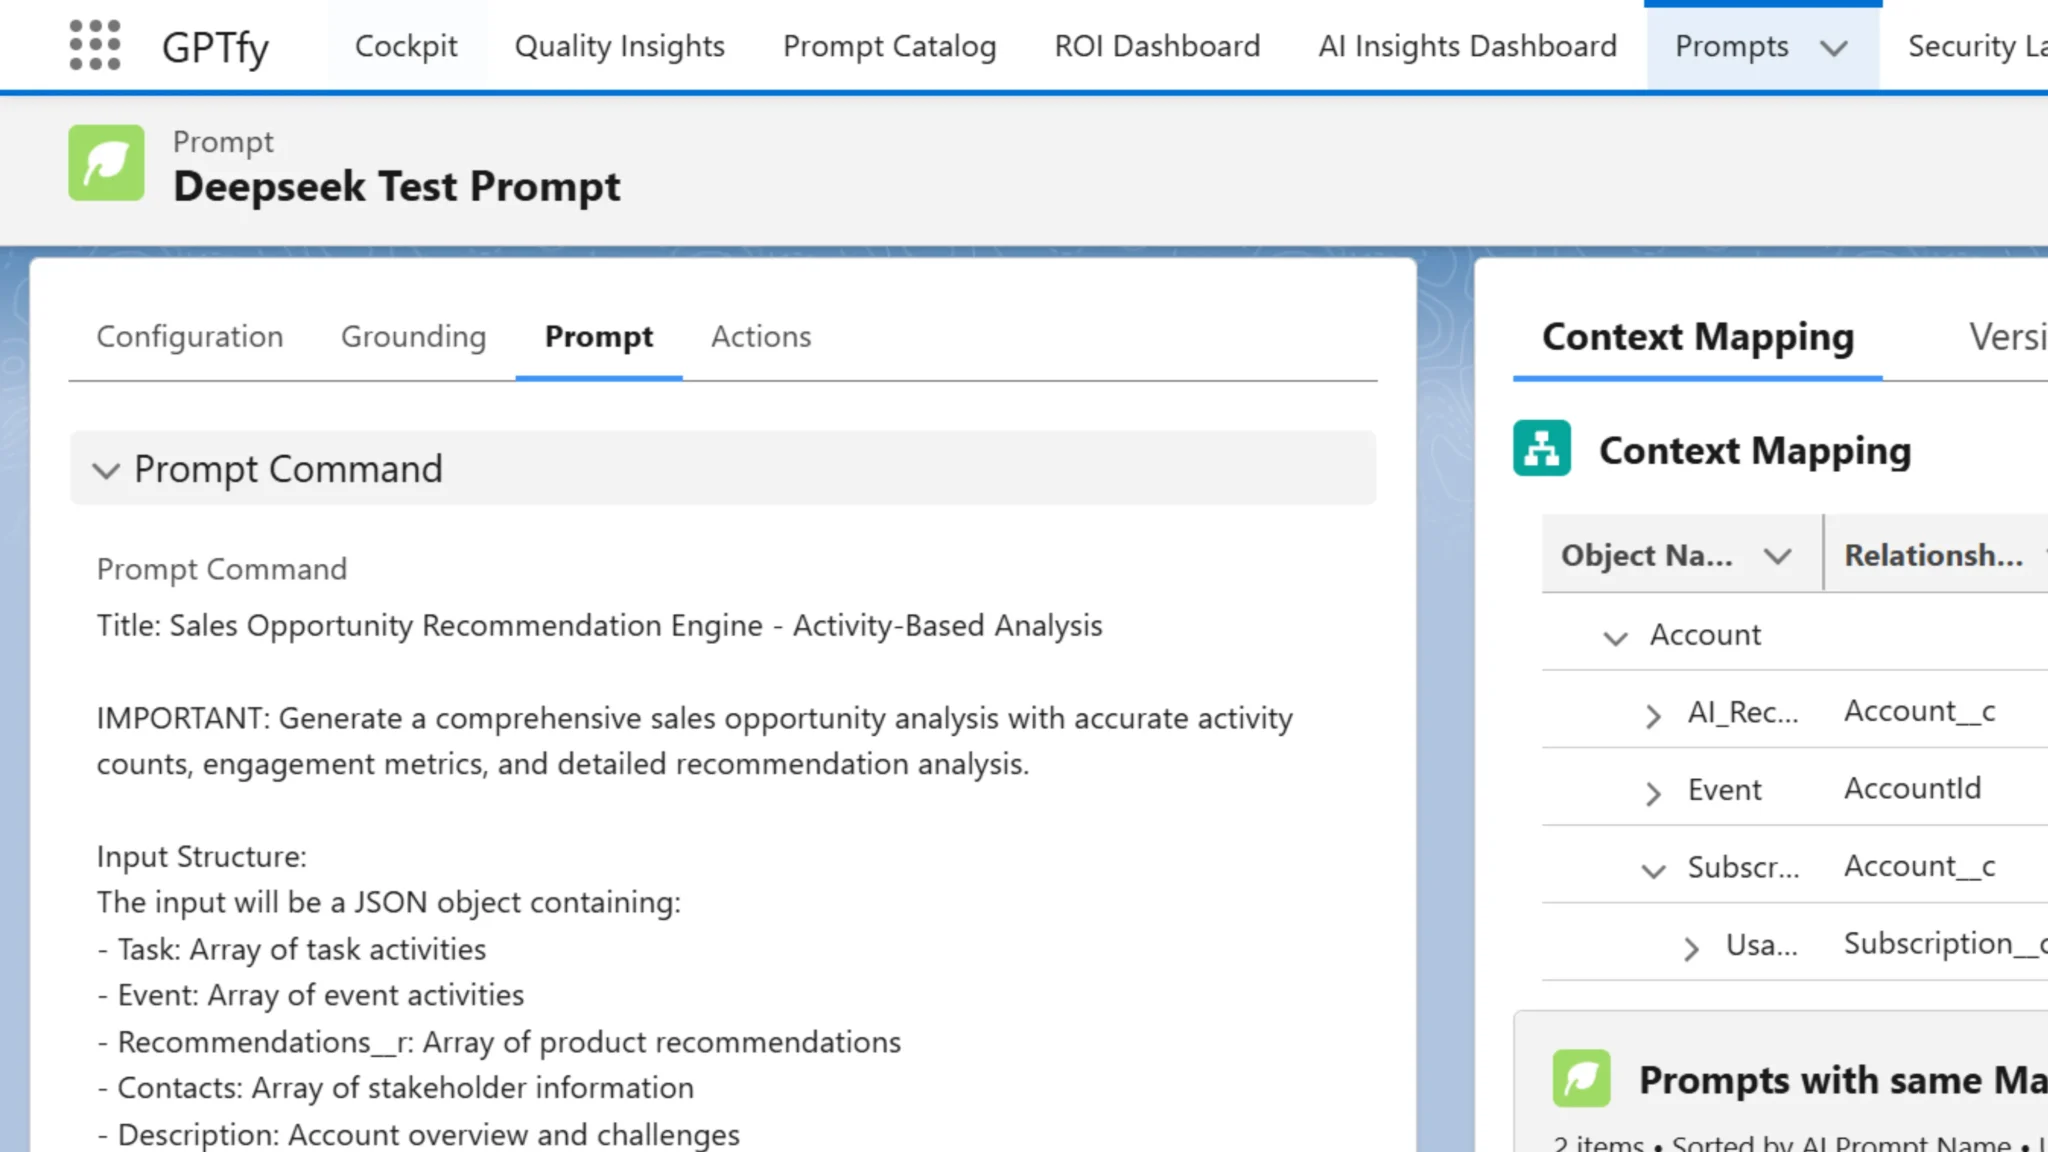
Basic DeepSeek Account Analysis Prompt
Title: Sales Opportunity Recommendation Engine - Activity-Based Analysis

IMPORTANT: Generate a comprehensive sales opportunity analysis with accurate activity counts, engagement metrics, and detailed recommendation analysis.

Input Structure:
The input will be a JSON object containing:
- Task: Array of task activities
- Event: Array of event activities
- Recommendations__r: Array of product recommendations
- Contacts: Array of stakeholder information
- Description: Account overview and challenges
- Name: Account name
- Industry: Account industry

Step 1: Data Processing
Calculate the following metrics:
1. Total Activities MUST be calculated as follows:
- Task count = Number of items in Task array (if exists, else 0)
- Event count = Number of items in Event array (if exists, else 0)
- Total Activities = Task count + Event count
- Example:
* If Task has 1 item and Event has 1 item, Total = 2
* If only Task has 1 item, Total = 1
* If neither exists, Total = 0
- Important: ALWAYS count both Task and Event arrays separately and sum them

2. Engagement Score (0-10 scale):
- Base score: 5 points
- Activity bonus: 0.1 points per activity (sum of Tasks AND Events)
- Recommendation bonus: 1.25 points per recommendation
- Cap at 10 points
- Example:
* 2 activities (0.2 points) + 2 recommendations (2.5 points) + base (5) = 7.7

3. Stakeholder Analysis:
- Format: "${FirstName} ${LastName} - ${Title}"
- Include role-specific description
- Extract priorities from Event descriptions related to stakeholder

4. Focus Areas:
- Extract from stakeholder descriptions
- Include themes from Event descriptions
- Present as comma-separated list
- Prioritize recurring themes

5. Recommendation Analysis:
- Priority Score (0-100):
* Pain point alignment: 30%
* Stakeholder preference match: 25%
* Financial impact: 25%
* Implementation feasibility: 20%
- Key Benefits: List specific product advantages
- Stakeholder Alignment: Map benefits to stakeholder needs

Required Output Format:
Return the following HTML structure exactly as shown, without any markdown formatting or code block indicators:

<div style="font-family: system-ui, -apple-system, sans-serif; width: 100%; max-width: 1200px; margin: 0 auto;">
<div style="padding: 2rem; background-color: #f8f9fa; border-radius: 8px;">
<!-- Account Overview -->
<div style="margin-bottom: 2rem;">
<h2 style="color: #16325c; margin-bottom: 1rem;">Account Overview</h2>
<div style="color: #485875;">
<strong>Account Name:</strong> {{Name}}<br>
<strong>Industry:</strong> {{Industry}}<br>
<strong>Key Challenges:</strong> {{Description}}
</div>
</div>

<!-- Activity Analysis -->
<div style="margin-bottom: 2rem; border-bottom: 1px solid #eef1f6; padding-bottom: 2rem;">
<h3 style="color: #16325c; margin-bottom: 1rem;">Activity Analysis</h3>
<div style="display: flex; gap: 2rem;">
<div style="flex: 1; background: #ffffff; padding: 2rem; border-radius: 8px; box-shadow: 0 1px 3px rgba(0,0,0,0.1);">
<div style="color: #67758d; margin-bottom: 1rem;">Total Activities</div>
<div style="font-size: 2rem; font-weight: bold; color: #16325c;">{{ActivityCount}}</div>
</div>
<div style="flex: 1; background: #ffffff; padding: 2rem; border-radius: 8px; box-shadow: 0 1px 3px rgba(0,0,0,0.1);">
<div style="color: #67758d; margin-bottom: 1rem;">Engagement Score</div>
<div style="font-size: 2rem; font-weight: bold; color: #16325c;">{{EngagementScore}}</div>
</div>
<div style="flex: 1; background: #ffffff; padding: 2rem; border-radius: 8px; box-shadow: 0 1px 3px rgba(0,0,0,0.1);">
<div style="color: #67758d; margin-bottom: 1rem;">Key Focus Areas</div>
<div style="font-size: 1.25rem; color: #16325c;">{{FocusAreas}}</div>
</div>
</div>
</div>

<!-- Stakeholder Insights -->
<div style="margin-bottom: 2rem; border-bottom: 1px solid #eef1f6; padding-bottom: 2rem;">
<h3 style="color: #16325c; margin-bottom: 1rem;">Stakeholder Insights</h3>
{{#each Contacts}}
<div style="background: #ffffff; padding: 1.5rem; border-radius: 8px; margin-bottom: 1rem; box-shadow: 0 1px 3px rgba(0,0,0,0.1);">
<div style="font-weight: bold; color: #16325c;">{{FirstName}} {{LastName}} - {{Title}}</div>
<div style="color: #485875; margin-top: 0.5rem;">{{Description}}</div>
</div>
{{/each}}
</div>

<!-- Product Recommendations -->
<div style="margin-bottom: 2rem;">
<h3 style="color: #16325c; margin-bottom: 1rem;">Recommended Solutions</h3>
{{#each Recommendations__r}}
<div style="background: #f8fff9; padding: 1.5rem; border-radius: 8px; margin-bottom: 1rem; border: 1px solid #d1e7dd;">
<div style="font-weight: bold; color: #16325c;">{{Name}}</div>
<div style="color: #485875; margin-top: 0.5rem;">{{Product__r.Description}}</div>
<div style="display: flex; gap: 2rem; margin-top: 1rem;">
<div style="color: #28a745;">
<strong>Est. Revenue:</strong> ${{formatNumber Estimated_Revenue__c}}
</div>
<div style="color: #28a745;">
<strong>Est. Margin:</strong> ${{formatNumber Estimated_Margin__c}}
</div>
</div>
<div style="margin-top: 1rem;">
<strong>Key Benefits:</strong>
<ul style="list-style-type: circle; padding-inline-start: 1rem;">
{{#each KeyBenefits}}
<li>{{this}}</li>
{{/each}}
</ul>
<strong>Stakeholder Alignment:</strong>
<ul style="list-style-type: circle; padding-inline-start: 1rem;">
{{#each StakeholderAlignment}}
<li>{{this}}</li>
{{/each}}
</ul>
<strong>Priority Score: {{PriorityScore}}</strong>
</div>
</div>
{{/each}}
</div>
</div>
</div>

Data Processing Rules:
1. Activity Count (MUST FOLLOW EXACTLY):
- ALWAYS check both Task and Event arrays
- Task count = Task array length (if exists, else 0)
- Event count = Event array length (if exists, else 0)
- Total = Task count + Event count
- Validate that both arrays are counted before outputting total

2. Engagement Score:
- Calculate based on actual metrics
- Base: 5 points
- Activities: +0.1 per activity (sum of ALL Tasks AND Events)
- Recommendations: +1.25 per recommendation
- Round to one decimal place
- Maximum: 10 points

3. Currency Formatting:
- Add commas for thousands
- Show cents if present
- Include dollar sign
- Example: $1,234,567.89

4. Priority Score Calculation:
- Pain point alignment (30%): How well solution addresses key challenges
- Stakeholder preference match (25%): Alignment with stakeholder needs
- Financial impact (25%): Revenue and margin potential
- Implementation feasibility (20%): Ease of implementation
- Score should be 0-100, rounded to nearest integer

5. Focus Areas:
- Extract from Event descriptions if available
- Combine with themes from Contact descriptions
- Prioritize based on frequency of mention
- Present as comma-separated list

DO NOT:
- Add markdown code block indicators
- Include any HTML tags outside the template
- Modify the existing HTML/CSS structure
- Add numerical suffixes to names
- Use placeholder values
- Skip any analysis sections
- Change scoring weights
- Alter the template format
- Skip counting either Task or Event arrays
- Output activity count before checking both Task and Event arrays

Pre-Processing Validation:
1. Confirm presence of both Task and Event arrays
2. Count items in each array separately
3. Sum the counts before displaying total activities
4. Verify engagement score calculation includes all activities
5. Double-check currency formatting
6. Validate priority score calculations
The last line is particularly important – it leverages DeepSeek’s reasoning capabilities to provide transparency into how it reached its conclusions.
Grounding Rules Configuration
To ensure consistent, high-quality AI responses, the following grounding rules are applied:
Ethical Grounding
- Avoid demographic assumptions: Do not make assumptions about individuals based on their demographics.
- Present balanced perspectives: Ensure all viewpoints are considered and presented.
- Avoid emotive language: Keep the tone neutral and professional.
Content Grounding
- Provide complete reasoning: Always explain your thought process clearly and fully.
- Use objective evidence: Provide data and factual sources to support all conclusions.
- Cite sources for numbers: When referencing statistics or figures, always include the source of the data.
- Avoid speculation: Do not make assumptions about information that is not provided.
Dynamic Grounding
- Respect locale specifics: When referring to dates and amounts, always follow the USA locale format for consistency.
Implementation in GPTfy Prompt Builder
You can configure all these grounding rules within the GPTfy Prompt Builder with no need for coding:
- Create your prompt: Design prompts that cater to your business requirements.
- Apply grounding rules: Select appropriate grounding rules from the pre-configured library.
- Test with sample records: Ensure the prompt works as expected with sample data.
- Activate for production: Once tested, deploy your prompt for live use.
Security and AI Model Flexibility
With GPTfy, you can bring any AI model to your Salesforce system. Whether you're using Pro, Enterprise, or Unlimited editions, your data never leaves Salesforce, ensuring full security.
Real-World Implementation
Use Case: Data-Driven Sales Opportunity Analysis
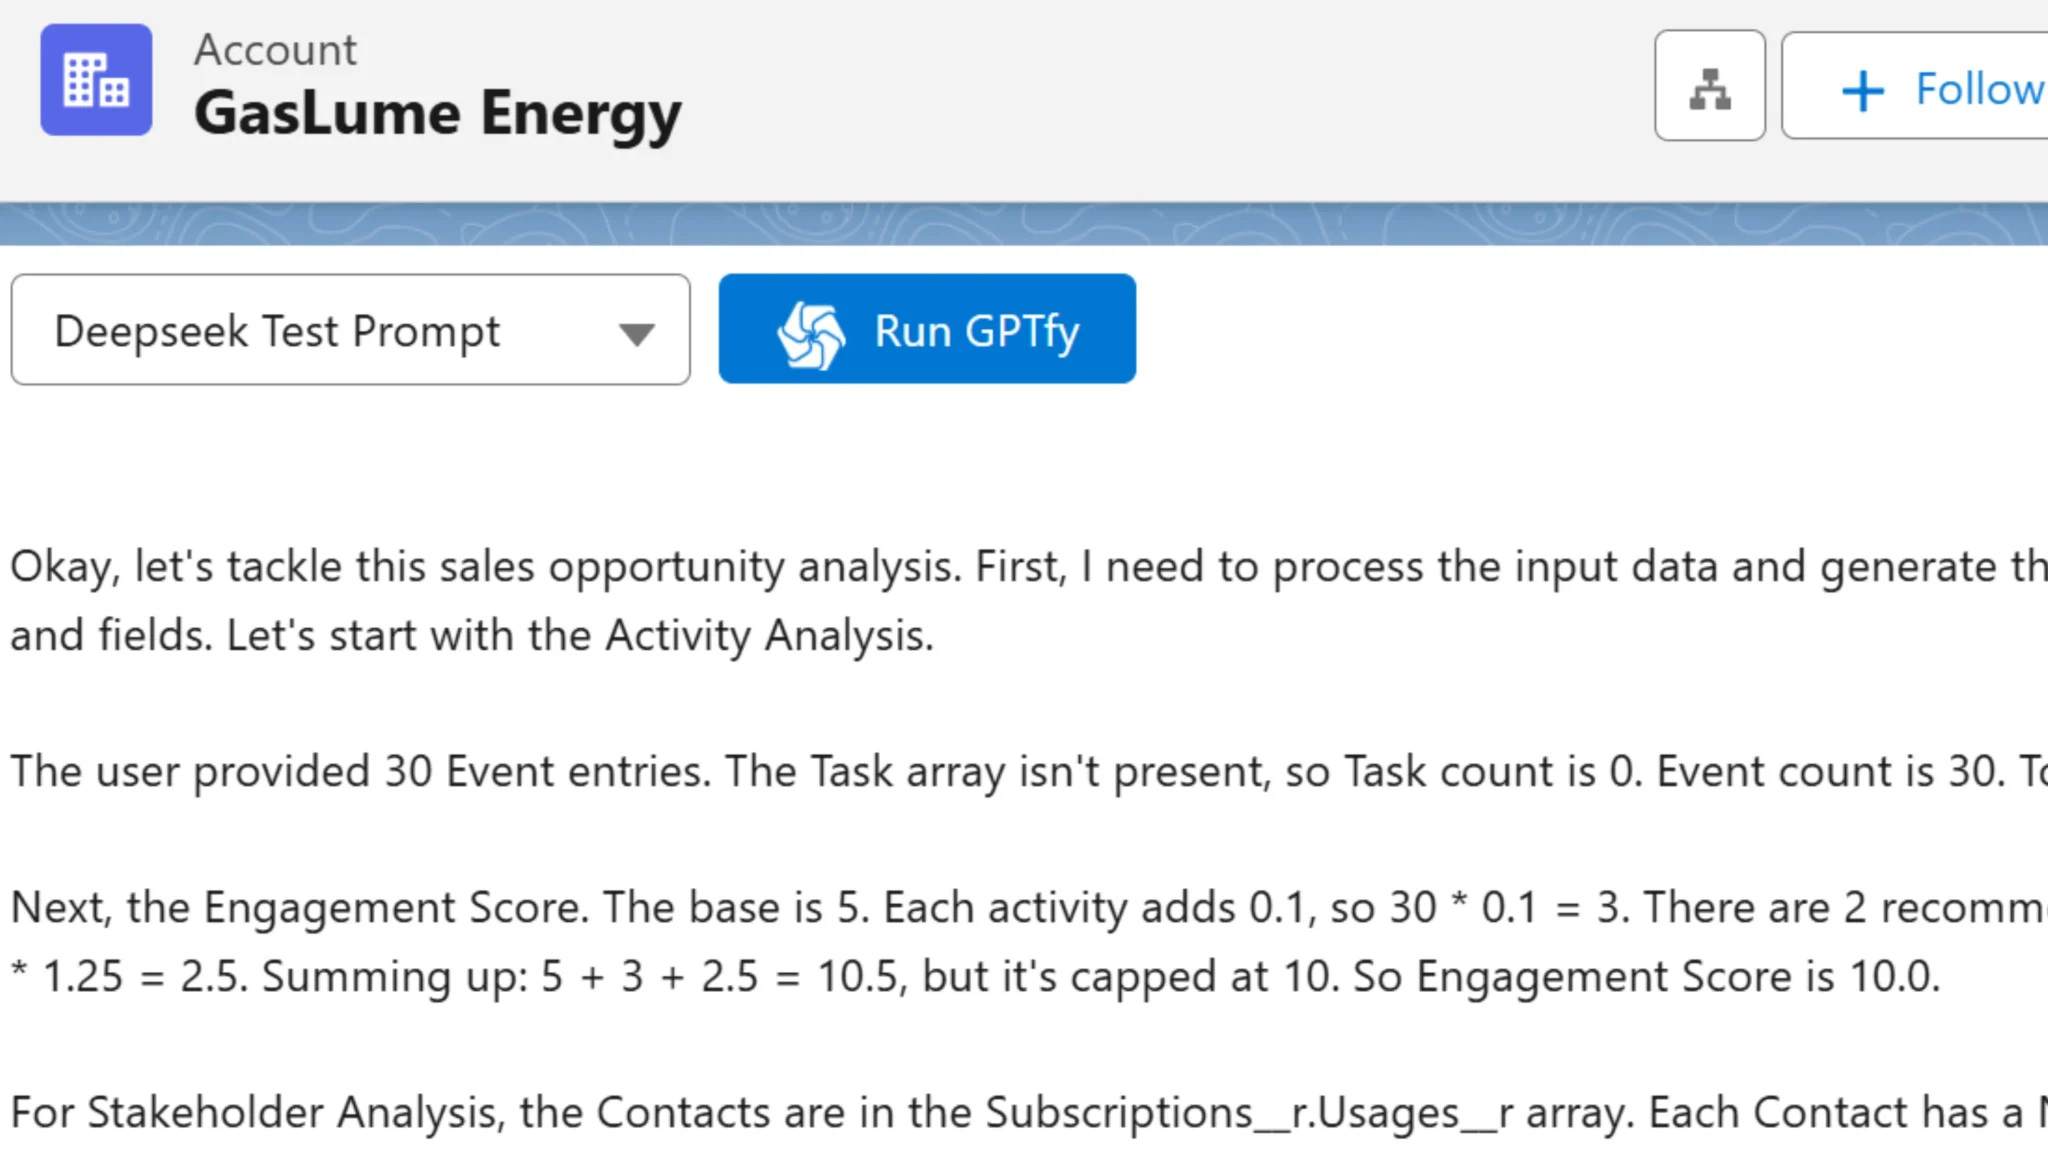
Here’s an example of DeepSeek R1 in action:
In a testing environment, we used a “DeepSeek Test Prompt” for the GasLume Energy account to analyze complex sales opportunities. The prompt processed data such as multiple stakeholders and engagement metrics. Here’s how it works:
- Engagement scores: DeepSeek calculates engagement scores based on activities.
- Stakeholder information: It formats data from Salesforce contacts.
- Focus areas: Highlights key priorities based on the account description.
- Recommendation analysis: It performs analysis with multi-criteria scoring to suggest focus areas.
Practical Applications
The above process can be adapted to various use cases:
- Opportunity Prioritization: Analyze pipeline deals to prioritize those requiring immediate attention based on engagement metrics.
- Contract Risk Analysis: Identify compliance issues or potential liabilities in contracts, with transparent reasoning for each flagged issue.
- Customer Support Enhancement: Generate technical solutions from knowledge base articles, with step-by-step explanations.
- Executive Briefing Preparation: Automatically create account summaries with relationship histories and strategic recommendations.
The benefit? All this functionality requires no additional code or complex configurations, just proper prompt engineering leveraging DeepSeek’s reasoning capabilities.
Implementation Roadmap
Phase 1: Foundation (1-2 days)
- Configure Azure DeepSeek R1 deployment.
- Set up Named Credentials in Salesforce.
- Configure GPTfy AI Model and test basic connectivity.
Phase 2: Security Framework (1 day)
- Map data context and implement security layers for PII protection.
- Test using sensitive data records to ensure compliance.
Phase 3: Use Case Development (3-5 days)
- Develop and refine business-specific prompts.
- Configure relevant grounding rules for best results.
- Test and refine based on response quality.
Phase 4: Production Deployment (1 week)
- Deploy to production.
- Train users on capabilities and limitations.
- Establish a feedback loop for continuous improvement.
This structured approach ensures you can implement advanced AI capabilities quickly, with a secure and scalable foundation.
Conclusion
Within hours of Microsoft announcing DeepSeek R1 on Azure, we integrated it with Salesforce using GPTfy’s zero-code configuration. This proves how quickly businesses can benefit from cutting-edge reasoning capabilities while maintaining security and flexibility.
This implementation architecture not only speeds up deployment but also builds a technical foundation that is secure, model-agnostic, and flexible for future AI advancements. It’s about deploying AI capabilities in days, not months, while ensuring the security and customization your business needs.